
Your vehicle’s brake lights warn the cars behind you when you are slowing down or stopping your vehicle. If your brake lights do not function, rear-end collisions are highly likely. So, to keep your brake lights working, you must know something about the brake light wiring system.
Table of Contents
Understand the brake light wiring system
The system of brake light wiring is not too complex. Lights at one end have bulbs in the socket that connect to the wiring harness. On the other end, you will see a brake switch. When you press the pedal down, it creates contact and puts the lights on. This braking system takes power from the car’s battery.
Primarily, the brake light system has two critical components:
Brake light switch
You can find brake light switches in modern trucks, including Chevrolet, Ford, and many others. It is a part of the brake-pedal assembly that you can find either on the firewall bear pedal lever or under the dashboard.
The brake light switch has two sides; a hot side and a cold side. The hot side is the terminal having battery voltage, while the cold side delivers the voltage to brake lights according to the demand. Knowing this means you can avoid melting wires and blowing off fuses.
Nowadays, in modern cars, the brake light switches also:
- Help in the push-button start and gear selector shift
- Influence the vehicle stability control system and ABS (Anti-Lock Brake System)
Brake light relay
Initially, vehicle manufacturers used a hydraulic pressure system, which repeatedly failed. By the end of the 1960s, manufacturers shifted to more reliable brake light switches. Nowadays, manufacturers use a brake light relay with a low voltage control circuit controlling the main power supply switch of the brake lights. This configuration makes a reliable brake switch mechanism, which has a long lifespan.

Caption: brake light system with a relay
Source: https://rustyautos.com/
Why Don’t My Brake Lights Work?
As the brake light system is quite simple and comprises only a few components, it is easy to troubleshoot the system. If you face faulty brake lights, there can be multiple reasons, such as broken brake lights, blown fuses, or a burned-out bulb.
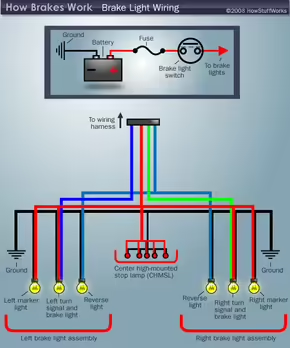
Caption: brake light system
Source: https://www.pinterest.com/
You can experience a brake light breakdown in three different conditions. Let’s take a sneak peek into each situation, possible reasons for the problem, and how to identify them.
When one or more lights do not work
If at least one brake light works, it is easier to identify and correct the problem. The possible issues can be:
- Check the brake light circuit fuse if the lower two lights or 3rd brake lights go off. There is one fuse for the third light and the other for the lower two lights in some vehicles.
- Next, check the brake light bulbs. For this, you can get to them via the trunk, or you can open the screws that are around the lens. Check your vehicle repair manual if needed. Pull out the bulb by turning it clockwise for about a quarter. Now, examine the bulbs. If you see any dark areas in the bulb, it is not working. Check for the bulb filaments too. The bulb is the issue if you notice any burned or broken filament. If the problem is with the bulb, replace it with the same type and wattage. Refer to your car’s manual for the correct bulb purchase.
- If your bulb looks fine, you must check the socket’s voltage with a digital multimeter.
- First, set the multimeter to the DC voltage. Now press the black lead to the socket wall and the red to one of the contacts. Next, ask someone to depress the pedal brakes.
- If there is voltage, it means the light bulb is at fault. If not, do the test again but put the black lead to the chassis this time.
- If you notice voltage, you must check the socket’s ground connection.
- If there is no voltage, see if the bulb’s socket has any corrosion or loose wires. Try to remove any decay, if there, using a brush.
- Checking the neutral connection on the socket:
- Firstly, pick a wire (jumper) and connect it between the excellent chassis ground and the socket’s ground side. Keep the brake light bulb in its place and press the pedal brake.
- If the brake light bulb turns on, there is a fault at the ground connection. Alternatively, check the open between wires transmitting current between the brake light and pedal light switch.
When no brake light works
When no brake light works, it indicates a problem with the whole circuit. The components that affect the entire course include the switch of the brake light, turn light, or fuse.
Check the fuse:
- Firstly, find out where the brake light fuse is. You can generally find fuses under the dashboard, under the hood, or towards the driver or passenger side. Check your car’s manual if you don’t know the panel of the fuse or the center for the power distribution.
- When found, remove the lid of the fuse panel and look for the desired fuse by reading the descriptions.
- Nowadays, there is a transparent plastic box that houses the fuse. You can use a fuse dragger from the box panel. Alternatively, you can use a needle-nose plier to remove the fuse. There are spade connectors at both ends of the fuse, and a narrow strip of metal connects these connectors.
- Next, check the condition of the fuse. Look at the element of the fuse, and you may know if it is blown or not. Alternatively, you can verify a fuse with the help of a multimeter. First, set the multimeter to the continuity or a low resistance setting at ohm’s scale. Next, touch the fuse connector to the lead of the multimeter. If you hear a beep-like sound, it means the fuse is working. If no beep or the multimeter shows infinite resistance, the fuse is not working.
If the fuse is at fault, supplant it with a similar fuse of the same current rating. Also, if you found your fuse blown out, you must check the reason; otherwise, the newly replaced fuse may also blow out.
Check the brake light switch:
- First of all, keep your manual handy for your vehicle model. For checking the brake light switch, it is essential to know the location, its brake light diagram, and the wiring connections. It is necessary to know all these because, at times, the brake light switch also communicates with various other devices such as the BCM, cruise control, or traction control. Generally, the brake light switch towards the arm of the brake pedal will be visible. Also, you can find it near the master cylinder of the brake, on the vehicle driver’s side, or the firewall. (Vehicles having cruise control may have two switches for brake lights. Look in your automobile repair guides for the same.)
- When you find the brake light switch, look for its electrical connector. Now, you can test the control in two ways. First, connect the testing light to a working ground connection underneath the dashboard. When the switch is connected to any module, you must set a relationship between the test light and a power source like a battery. Now, if you can access the connector of the switch, try to back probe its two terminals at the connector. There is no need to unplug the connector. If you can’t access the connector, open it and back probe both terminals. Your test light must turn on when you feel the first terminal but not when you search for the second one. Now, press the pedal brakes and back probe the switch’s connector simultaneously. Now, the test light must be on when you probe both terminals. On the other hand, if the test light goes on when you feel just one airport, you must adjust or replace the brake light switch. On the other hand, if the test light does not turn on, it means there is an open or short circuit on the ground or power side of the course.
The Check for the electrical ground:
- Take a wire (jumper) and connect the brake switch to the good earth.
- Press the pedal down. If the brake lights turn on, there’s terrible ground. Look for corroded, damaged, or loose brake light wires. It would help if you fixed the ground connection.
- Also, check the electrical continuity between ground wires and the brake light switch.
Check the turn signal switch:
- If you cannot find a fault, you should check your turn signal switch. First, check the wiring harness diagram of the turn signals switches from the vehicle’s repair manual. Now, look for the wires that connect the turn signal switch to the pedal brake light switch.
- Access the connector of the turn signal switch. Look for the wire in the wiring diagram connecting both switches.
- Now, depress the brake pedal as it will activate the brake switch. Alternatively, you can unplug the brake switch and connect the two terminals using a jumper wire.
- Pick a test light and back probe the light switch wire that goes to the connector of the turn signal. Here, the testing light must turn on. If not, it means there is an opening in this wire. If the light turns on, press the pedal brake and back probe both the terminals carrying current from the signal light switch to the right and left indicator lights. If the testing light turns on, check the wires and connector connecting brake lights and signal switch. If not, there is a problem with the brake signal switch.
When the brake lights never turn off
Sometimes, you may see that your brake lights do not go off. A brake switch arrangement in some vehicles brings the brake switch to its normal position on pressing the brake pedal. However, when the brake switch moves out of its place or wears out, it causes the brake lights never to go off.
How do we troubleshoot this problem?
- First, run the brake pedal and observe how the brake lights operate with the pedal movement. You will need to adjust the brake switch to resolve the issue.
- To adjust the switch, unplug the brake switch connector. Now, rotate the button, so the sensor pedal moves away or towards the pedal, based on your situation. Now, place the sensor contact such that you need not depress the brake pedal very much before the lights turn on.
- Adjust it so that light turns on with a minor pedal movement.
- Also, adjust the switch to the correct location of the brake pedal.
- If the switch adjustment does not work, the mechanism of the internal switch is damaged, and you may need to replace the switch.
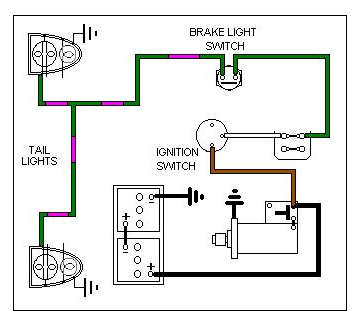
Caption: brake light wiring diagram
Source: http://www.mgb-stuff.org.uk/
Conclusion
If your brake lights show any of these three issues, start your diagnosis based on the above guide. Look for short circuits, damaged harness connectors, or bad wire connections. If you need to replace your brake light wiring harness, we can help you. We have a wide selection of cable assemblies for different industries. Our technicians and engineers can guide you to pick the best electrical accessory for your vehicles and help you in the effortless installation of all electrical components. Please feel free to reach us.